User journey mapping helps small businesses understand how customers interact with their brand, from discovering products to post-purchase support. It identifies pain points like slow-loading pages or confusing navigation and highlights opportunities to improve customer satisfaction and loyalty. For small businesses in India’s competitive market, this process can lead to higher conversions and cost-effective customer retention.
Key Takeaways:
- What is it? A visual timeline of a customer’s experience with your brand.
- Why does it matter? Improves customer experience, loyalty, and revenue growth (4–8% higher for businesses focusing on this).
- How to start? Define your scope, create customer personas, map touchpoints, and track emotions and pain points.
- Tools to use: Affordable options like Canva, Google Sheets, or advanced tools like UXPressia (₹1,330/month).
By following this guide, you can refine your website, reduce friction points, and better meet customer needs. Start with small, actionable steps like fixing broken links or simplifying checkout processes, and regularly update your journey map to keep pace with evolving user behaviour.
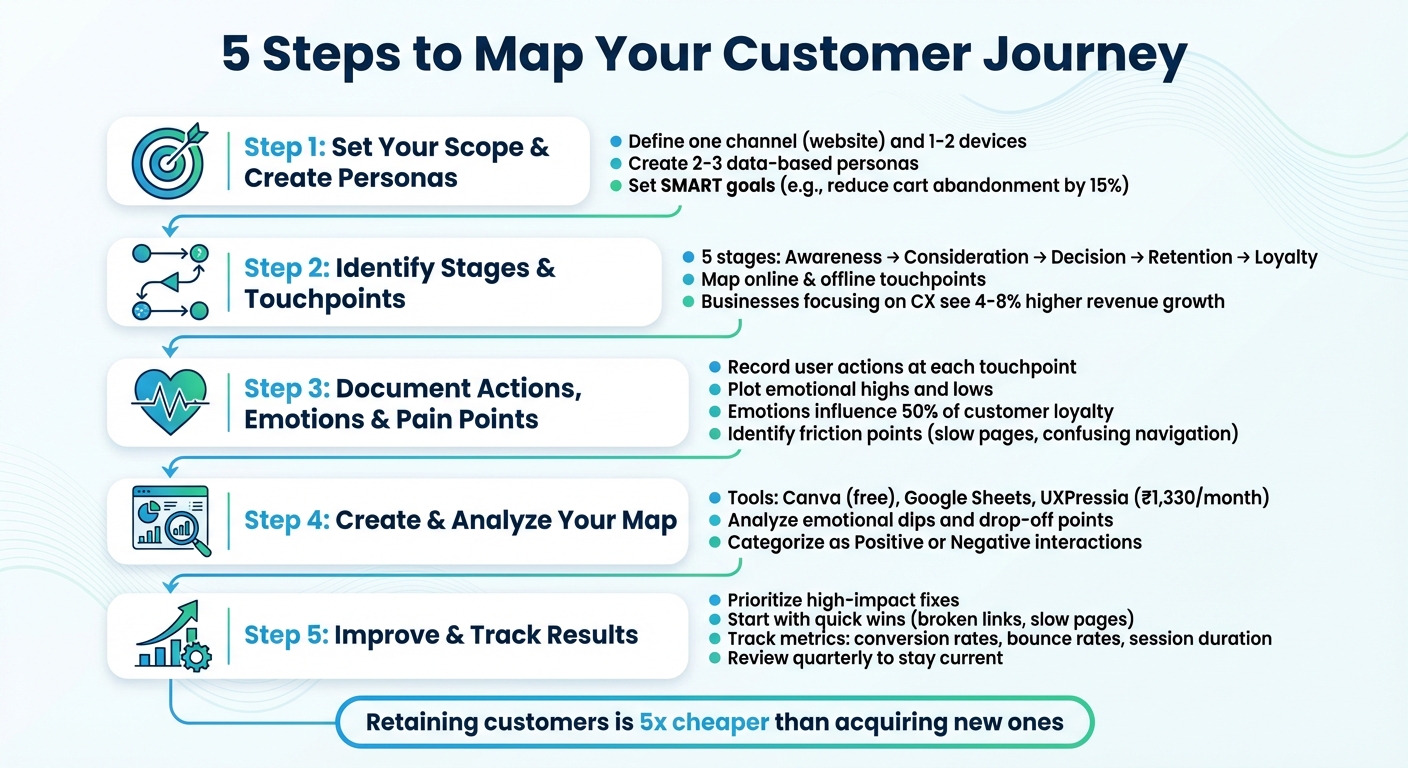
5-Step User Journey Mapping Process for Small Businesses
Step 1: Set Your Scope and Create User Personas
Setting the Scope of Your Journey Map
Start by defining the specific journey you want to map. Trying to cover every customer interaction can overwhelm you with data and dilute your focus. Instead, zero in on one channel – like your website – and one or two devices, such as mobile and desktop [7]. Pick a journey that has the potential to immediately influence revenue or one where you already have useful internal data [7].
Next, determine the type of map that aligns with your goal. A "Current State" map is great for identifying existing pain points – like a confusing checkout process – while a "Future State" map helps you imagine an ideal experience for something new, like a product launch or website redesign [1][6]. For small businesses, starting with a Current State map often makes the most sense, as it helps address immediate issues. To keep your efforts focused, set a SMART goal, such as "reducing cart abandonment by 15% within three months" or "boosting customer lifetime value by 22% by the end of the year" [6]. This clarity ensures your mapping exercise remains actionable and results-driven.
Building User Personas
Once your scope is set, it’s time to create 2–3 key personas that represent your primary customer segments [5]. Think of these personas as the "main characters" in your journey map – they help you visualise exactly who you’re designing for [1][3]. But don’t rely on assumptions; base these personas on real data from sources like Google Analytics, customer surveys, or input from your frontline staff [2][5][8]. As Pepper Square puts it:
Your personas are only as good as the research behind them
Each persona should include a fictional name, basic demographics (age, location, occupation), their main goals, and their biggest frustrations. For instance, an Indian small business selling electronics might create personas like "Rajesh, 32, a value-conscious shopper from Pune who wants affordable gadgets but finds unclear product specs frustrating" or "Priya, 28, a premium tech enthusiast from Bangalore who demands fast delivery and detailed product reviews." Add a short quote that captures their mindset, such as Rajesh saying, "I need to know exactly what I’m getting before I spend my money." These personal touches make it easier to empathise with their needs and design a journey that genuinely works for them.
With your personas ready, you’re all set to start outlining the journey’s stages and touchpoints.
Step 2: Identify Stages and Touchpoints
Breaking Down the User Journey into Stages
To map your customer’s journey, divide it into distinct stages [1]. A straightforward five-stage framework works for many small businesses: Awareness (when customers first learn about your brand), Consideration (when they weigh their options), Decision (when they make a purchase), Retention (when they use your product or service), and Loyalty (when they return or recommend you to others) [1][5][10]. If you’re focusing on digital products, tweak this framework to better fit your needs [6].
For smaller teams managing multiple roles, a four-stage model might be easier to manage: Awareness/Consideration, The Sale Process, The After-Sale Process, and Retention/Referral [9]. Whatever framework you choose, consistency is key. Remember, keeping existing customers is far more cost-effective than acquiring new ones. In fact, businesses that focus on enhancing customer experience see their revenue grow by 4-8% more than those that don’t [5]. Once you’ve defined the stages, the next step is to identify the key interactions within each one.
Finding User Touchpoints
Within each stage, pinpoint touchpoints – the moments when customers interact with your brand [1][3]. These interactions can be online, such as social media ads, website visits, email campaigns, or Google search results. They can also be offline, like in-store displays, phone calls to customer service, or handwritten thank-you notes included in purchases [5]. For instance, a customer might first encounter your brand on Instagram, visit your website, and read third-party reviews before deciding to buy.
To ensure you capture all touchpoints, combine analytics with input from frontline staff who are directly engaging with customers [5][10]. Additionally, search for your brand online to uncover interactions you might have missed. Once you’ve listed all touchpoints, evaluate each one for customer satisfaction. This will help you identify areas where friction is turning positive moments into negative experiences [11]. Since emotions play a role in 50% of customer loyalty, understanding where customers feel frustrated or delighted at each touchpoint is crucial for refining their experience [5].
Step 3: Document Actions, Emotions, and Pain Points
Recording User Actions and Goals
At every stage of the user journey, it’s essential to track what users are doing and why. For each touchpoint, detail their actions and what they hope to achieve – whether it’s clicking an ad, searching for a product on your site, or navigating through the checkout. Try to understand their motivations. Are they looking for solutions to a problem? Or maybe they’re comparing prices to make an informed decision?
Organise these actions by journey stage. For instance, in the Awareness phase, a user might stumble upon your ad while scrolling through Instagram. In the Consideration phase, they could be reading product reviews or comparing descriptions. And in the Decision phase, they might add items to their cart and proceed to payment. Also, make a note of their expectations. For example, they might assume your website will load in under three seconds or expect to find a "size guide" conveniently located near the product image. Use tools like website analytics or session recordings to validate these observations. Once you’ve mapped these actions, overlay user emotions to identify areas that need attention.
Mapping Emotions and Identifying Pain Points
Now, take those recorded actions and add an emotional layer. Plot the emotional highs and lows for each interaction to create a visual trendline of the journey. Positive emotions can be shown rising on the graph, while negative ones dip downward. Use consistent markers to make these emotions easy to interpret. For instance, excitement can quickly turn into frustration when a page takes too long to load, or when users can’t find a basic feature like the "back" button.
"By visualising the emotional ups and downs of the experience, you’ll find the areas that require refinement." – Abel Rodriguez, BuiltIn [12]
When documenting pain points, write them from the user’s perspective to capture their frustrations clearly. For example, "I am frustrated because I can’t find shipping costs until the final checkout step." Common issues for small businesses often include slow-loading pages, confusing site navigation, unclear product descriptions, and overly complicated checkout processes. Highlight these pain points on your map using bold colours or eye-catching typography so they stand out to stakeholders.
To dig deeper into user frustrations, gather qualitative data through quick in-app surveys or interviews. This provides context beyond what analytics can offer. Since emotions influence 50% of customer loyalty [5], identifying where users feel happy or disappointed is critical to improving their overall experience.
sbb-itb-3716372
Step 4: Create and Analyze Your Journey Map
Tools for Creating Journey Maps
When it comes to crafting a visual journey map, the right tools can make all the difference. Platforms like Miro and Lucidchart provide expansive canvases for brainstorming and real-time collaboration, complete with sticky notes and flowchart features. If you’re looking for advanced options – such as emotional trendlines or persona integration – UXPressia (starting at approximately ₹1,330/month) and Smaply (around ₹1,660/month) are worth considering. Designers might prefer Figma (₹1,000/month for Professional plans), which combines journey mapping with UI design capabilities.
On a tighter budget? Canva offers free, customisable templates that work well for text-heavy maps. Even simpler tools like Google Sheets or PowerPoint can get the job done as starting points. The most important factor is choosing a tool your team will consistently use and update. As Ashley Walton, VP of Content & Creative at Clearlink, wisely notes:
"The purpose of a journey map is to surface opportunities – not win design awards."
Prioritise clarity and collaboration over perfection. Once your tool is in place, shift your focus to analysing and refining the user experience.
Analysing Your Map for Improvements
With your touchpoints and emotional mapping documented, it’s time to dig deeper and identify areas for improvement. Start by examining the emotional trendline you’ve plotted. Pay close attention to any dips – these are moments where users may feel frustrated or confused, often signalling the most pressing issues. Next, locate drop-off points where users abandon their journey entirely. Common culprits include overly complicated checkout processes, slow-loading pages, or unclear product descriptions. Website analytics can help here; use path analysis to track users’ actions leading up to these friction points.
To make sense of your findings, categorise interactions into "Positive" (moments that delight users) and "Negative" (points of struggle). For example, if you’re using a platform like Greenmor, you might focus on streamlining booking flows or fixing broken links. Assign specific issues to the right team members – for instance, your web admin can handle signup errors, while your customer success team can refine onboarding emails.
Finally, validate your assumptions by gathering direct user feedback through surveys or interviews. Start with quick wins, such as fixing 404 errors or removing unnecessary design elements, to make immediate improvements while planning for longer-term changes.
Step 5: Improve the User Journey on Your Website
Prioritising Fixes and Improvements
Once you’ve analysed your website’s user journey, it’s time to turn those insights into meaningful improvements. Your journey map serves as a blueprint, helping you identify and address areas where users face the most frustration. For instance, if a significant number of users abandon their carts during checkout, consider simplifying the process – reduce the number of form fields or introduce a guest checkout option [4].
Focus on the areas that have the biggest impact on revenue and customer satisfaction [14]. Set clear, measurable goals, such as: "Reduce cart abandonment by 15% within two months" [15]. Tackle quick fixes like broken links or slow-loading pages first, while planning for larger projects like a full website redesign [6][4].
Assign specific tasks to the right team members. If users struggle with signup forms, your web admin should address it. If onboarding emails are confusing, involve the customer success team [13]. Collaboration is key – get input from sales, marketing, and support teams early in the process to ensure everyone is aligned. As Kate Kaplan from NN/g wisely points out:
A journey-mapping engagement without focus or buy-in will not be effective in optimising experience
For small businesses using tools like Greenmor, focus on improvements that fit your resources. If you’re managing the website yourself, start with simple fixes like improving navigation, adding clearer call-to-action buttons, or enhancing product descriptions. If you’re working with professionals, discuss more complex changes, such as streamlining booking flows or optimising the mobile experience.
Making Changes and Tracking Results
Once priorities are set, begin implementing changes and closely monitor the results. Test the live user experience yourself to confirm that friction points have been resolved [2][13]. You can also experiment with "fake door" tests – creating low-fidelity prototypes to gauge user interest before committing to extensive development [6].
Measure progress by aligning metrics with the emotional touchpoints identified earlier. Keep an eye on key indicators like conversion rates at different funnel stages, average session duration, bounce rates, and drop-off points. These metrics will help you identify lingering pain points [16][15][1]. For example, slow page loading times can directly affect user retention [1][12].
Leverage analytics tools to automate tracking and view session data and user paths in your dashboard [16]. Segment this data by user type – such as new versus returning visitors – to understand which groups are benefiting most from your updates [15][1]. As Serra Alban emphasises:
Not reaching the value is never the users’ fault. It is yours
If certain improvements aren’t yielding the desired results, revisit your journey map and refine your approach. Regularly reviewing your map – ideally every quarter – ensures you stay aligned with evolving user behaviour [15][1]. Start small, keep measuring, and adapt based on real user feedback.
Conclusion
Key Takeaways
User journey mapping offers small businesses a chance to see their website through the eyes of their customers. By documenting every interaction, emotion, and challenge users face, you gain a clear understanding of where they encounter difficulties and where they have a smooth experience. This approach helps uncover issues like slow page loads, confusing navigation, or a complicated checkout process – problems that could be costing you sales. These insights pave the way for meaningful improvements to your website’s user experience.
Statistics back this up: businesses that focus on customer experience see revenue growth of 4–8% more, and retaining a customer is far more cost-effective – five times cheaper – than acquiring a new one. Interestingly, emotions play a big role, influencing 50% of customer loyalty [5].
Next Steps for Small Business Owners
Using these insights, start with small, actionable steps. Create 2–3 key customer personas based on actual data [5]. Then, walk through your website as if you’re a customer – from search to purchase – looking for points where users might drop off [2]. Document each step, note emotional highs and lows, and tackle quick fixes like fixing broken links or simplifying forms.
Your journey map isn’t a one-and-done exercise. It’s a dynamic tool that should change as your business grows. Set a schedule to review it every six months or during slower periods to ensure it stays relevant to your customers’ evolving needs [5][6]. And if you’re ready to act on the insights from your map, tools like Greenmor can help you optimise your website – whether you’re handling the updates yourself or working with professionals to create a more user-friendly experience.
Don’t wait – starting a simple journey map today can make a big difference in how your customers interact with your business.
FAQs
What is the best way for small businesses to create user personas?
Creating user personas is a smart way for small businesses to truly understand their customers. Instead of vague assumptions, personas turn customer insights into vivid, relatable profiles. These profiles represent typical customer groups, detailing their demographics, goals, challenges, and communication preferences. For small businesses in India, this approach is especially helpful, as it enables them to optimise their resources while designing more personalised customer experiences.
Here’s how small businesses can create effective user personas:
- Gather data: Combine numbers and stories. Use tools like website analytics and sales reports for quantitative insights, and pair them with customer surveys or interviews for qualitative feedback.
- Spot trends: Identify common characteristics such as age, location, income, device preferences, motivations, and challenges. Group customers into meaningful segments based on these patterns.
- Build profiles: Bring each persona to life by giving them a name and a backstory. Highlight their goals, struggles, and trusted platforms like WhatsApp or Instagram. Include a snapshot of their daily life to make the profile relatable.
- Keep them updated: Personas aren’t static. Test them with real customers, gather feedback, and tweak them as market trends shift or customer behaviours evolve.
With clear personas in hand, Greenmor can help you design a website that speaks directly to your audience. This ensures your site connects with each segment effectively, driving stronger engagement and results.
How can small businesses quickly improve the user journey on their website?
To make your website more user-friendly, start by streamlining navigation. Keep menus straightforward, limit the clicks needed to access key sections like product or contact pages, and ensure the journey feels natural and smooth. Page load speed is another critical factor – compress images, enable caching, and use a CDN to ensure fast loading, especially for mobile users in India who might be on slower networks.
Simplify your checkout process to reduce friction. Cut down on unnecessary form fields, offer a guest checkout option, and include a clear progress indicator to guide users. Small adjustments, like these, can help lower cart abandonment rates. Use prominent, action-oriented buttons with clear calls to action such as "Buy now" or "Get a free quote". Place them strategically where users naturally focus, like above the fold or at the end of product descriptions.
Incorporating on-page assistance, such as live chat or tooltips, can address user concerns in real time, turning potential hurdles into opportunities for positive interaction. These seemingly small changes can have a big impact on engagement and conversions. Greenmor can help implement these strategies while customising the experience for Indian users, using ₹ pricing, dd-mm-yyyy date formats, and British English conventions.
Why is understanding user emotions important in journey mapping?
Understanding how users feel is a key part of journey mapping. It allows businesses to step into their customers’ shoes and see their services through a different lens. For instance, emotions like excitement during product discovery or frustration with a complicated checkout process can reveal critical pain points. These emotional cues often highlight where customers might drop off or feel dissatisfied.
By tapping into these insights, teams can better connect with their users and focus on changes that make the experience more seamless and enjoyable. It also sheds light on underlying problems that might otherwise go unnoticed, giving businesses the chance to fine-tune their processes, boost customer happiness, and build stronger loyalty over time.